Develop Your Web Page
Home
Develop web page
Locate host
Publish
Exercises
1) Start Microsoft Word
Start > Programs > Microsoft Word
2) Edit your document
Properties
Background Text Graphics Hyperlinks Tables Design Tips Add Ons
3) Save your document as HTML
Menu bar: File > Save as…
Save as type: Web page (*.htm, *.html)
Tip: Use a short, meaningful name without spaces for your file. The file name is going to become part of the URL for your page when you load it to the web.
Tip: Name your home page ‘index.htm’ and you won’t have to specify the file name in your URL, just the basic URL.
Note: Double clicking on the file name in an ‘Explore’ file list will open the page for viewing in a web browser. To select your page for editing, you must right click on the file name and select ‘Edit’ to open the page in edit mode in Microsoft Word.
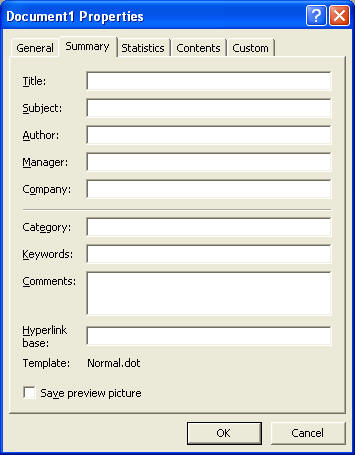
File properties are details about a file that help identify it — for example, a descriptive title, the author name, the subject, and keywords that identify topics or other important information in the file.
Menu bar: File > Properties….
Title
Whatever you choose to display for your title will be displayed in the top line of the browser when your page is displayed on the web. It will also be the name that is used for a Bookmark under Favorites.
Subject and Keywords
Whatever you choose to enter for subject and keywords will be used by web search engines as topics to index for your page.
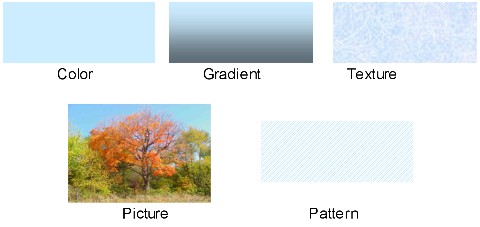
Word displays backgrounds that you add with the Background command on the Format menu in Web Layout View only. These backgrounds will not be printed on printed documents.Note:
Menu bar: View > Web Layout (to set your view type)
Format > Background…Menu bar:
You can select a solid color, or if you select Format > Background > Fill Effects…, you can select color gradients, textures, patterns, or pictures as your background.
Style Font Size Bold-Italics-Underline Bullets Color
Set style, font type, size, bold, italics, underline, bullets and text background and letter color using the icons from the ‘Formatting’ tool bar.
Warning: Not all font types and colors are available on all computers. Some that may look interesting on your computer may actually be displayed as a different, default, font and color on the internet. Example:
An interesting font and color like ‘Andy’
may end up looking like ‘Times New Roman’ in a different shade on someone else’s computer on the internet.
Insert > Picture (or icon of mountain with yellow background)Menu bar:
| From File (eg. A photo)
|
Word Art
|
Clip Art
|


Copy and paste
Place the mouse cursor over the graphic to copy (from anywhere - including the internet), right click. From the pop-up menu, select ‘Copy’. Go to your edit session for your web page, place the cursor where you want the object to be, right click, select ‘Paste’ from the pop-up menu.
Note: There are many web sites with free graphics that you can copy - some of them with animation. One such site is at http://www.prodraw.net/. You can also find images using Google’s image search, searching on your topic.
Size your graphic
Click on the graphic so that little square ‘handles’ appear. Grab a corner handle with the mouse pointer and move it in to make the graphic smaller or out to make the graphic larger.
Warning: Graphics that are very large can take a long time to load on the internet. .gif and .jpg files are the smallest formats. Avoid .bmp files. You can use some photo editing software to crop photos and to reduce the number of pixels used. Dragging the graphic corners in to make the graphic smaller does not reduce the number of pixels used.
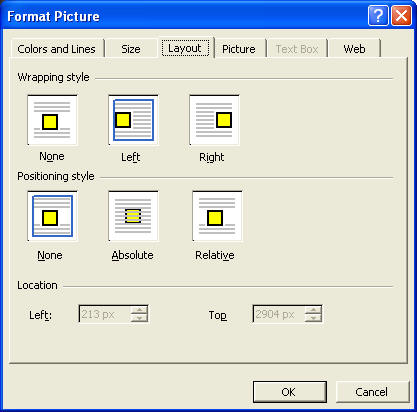
Place your graphic on the page:
Right click on your graphic, and select Format Picture -> Layout or Picture Properties -> Appearance (depending on the type of graphic). You can choose whether to left or right justify or center your graphic and whether to wrap text or not.
You can also control the placement of your graphic using tables - but more on that later.


Definition: A Hyperlink defines a link to a file, web page, email address, or location on a page. Clicking on the hyperlink takes you to that object or location. A hyperlink can be text or can be placed on an image or graphic.
Menu bar: Insert > Hyperlink… (or icon of world with link)
or right click on an image and select Hyperlink…
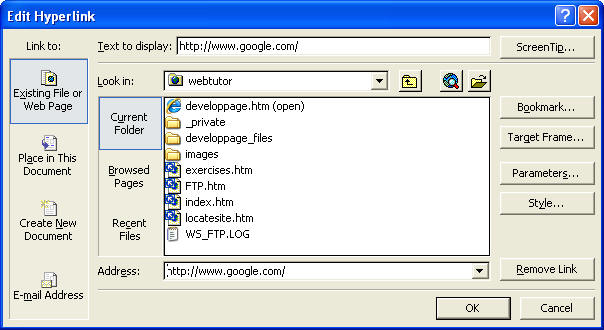
To link to a Web page:
Enter the URL for any address on the internet:http://www.google.com/ (Hint: copy & paste instead of typing for best accuracy - you can paste using Ctrl-V. If you have browsed the page recently, it will be listed under ‘Browsed Pages’ and you can select it.)Example:
Tip:
To cause the linked page to open in a new browser window, instead of replacing this one, select ‘Target Frame -> New Window’.To Link to an Existing file on your computer:
Use the ‘Current Folder’ or 'Recent Files' buttons or the folder icon to locate a file on your computer.
Warning: If you intend to publish your web page on the internet, DO NOT include the entire path name, just any subdirectories to the file you are in (if any) and the file name itself. Otherwise, the link on the internet will attempt to use the full path name to locate the file. This will appear to work fine on your computer - but others will get a ‘page not found’ error. As long as the subdirectory and file are within the same folder as the current page, the link will find it.
Example: Use: Myfile.htm
Do not use: C:\Myfolder\Myfile.htm
Email address:
mailto:towandalib@yahoo.comEmail addresses need to be proceeded by ‘mailto:’
Example:
Place in this document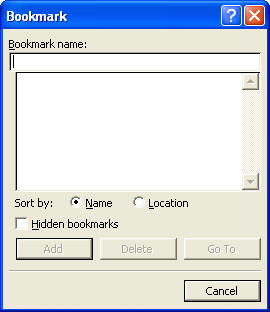
bookmarkFirst set up a
Place your cursor at the location you want to link to
Menu bar: Insert > Bookmark…
Type a name (without any spaces) for your bookmark and click ‘Add’
or set the font style for a text line to a ‘Heading’
Now add your hyperlink
Place your cursor at the location for the hyperlink
Menu bar: Insert > Hyperlink…
Select ‘Place in this document’ and select your bookmark or heading
To edit or change your hyperlink
Place your cursor anywhere on the link, right click, select ‘Edit Hyperlink...’.
To set the default format of your hyperlinks
Menu bar: Format -> Styles and Formatting…
Right click on Hyperlink, select Modify…
You can set the default font, text size, and color for your hyperlink. Note: You can override the defaults by setting the format for a specific hyperlink within your document.
A table is made up of rows and columns of cells that you can fill with text and graphics. You can use tables to create interesting page layouts and arrange text and graphics. Tabs do not work on web pages, so you can use tables to line up parts of your page in columns.
Without tables, your page will display differently on different browser types and different display size settings. With tables you can control the location of text and graphics on your page, regardless of the browser type or display size setting.
Cell
Column ↕ Row ↔
↔
↔ ↕ ↔ Create Tables
Menu bar: Table -> Insert Table... or use the Table icon on the tool bar. Select the number of rows and columns for your table.
Add rows and columns
With your cursor in the table:
Menu bar: Table -> Insert... -> Rows .. (or Columns...) to insert multiple rows or columns
or select a row in the table, right click, and select Insert Row, to insert one row at a time
Delete rows or columns
With your cursor in the table:
Menu bar: Table -> Delete... -> Row.. (or Column...)
or select a row in the table, right click, and select Delete Row to delete the selected row.
Resize columns
Grab the cell border with the cursor and drag to the desired position.
Split cells
With your cursor in the cell (or with multiple cells selected), right click and select Split Cells... You may specify the number of rows or columns to split the cell(s) into.
Merge cells
Select multiple cells, right click and select Merge Cells The multiple cells will become one.
Set Cell Properties - background, boundaries.
You can set cell properties by right clicking with your cursor in a cell or in a group of selected cells and selecting Borders and Shading...
Goal: Simplicity, clarity, clearness of purpose, speed of access, ease of navigation, interesting and/or useful content, unity of content, identifying information, attractive appearance, portability for different web browsers and display settings.
Sample layout:
Things to Avoid:
Don’t use backgrounds that are large, busy, or dark.
Don’t use huge images or images wider than the screen.
Don’t use the blink tag; many people find it annoying.
Don’t overuse bold text and headlines.
Don’t use construction signs or write ‘Under Construction’. If your page isn’t ready yet, don’t publish it.

FreeFind!
To add a search engine to your web site, login to the FreeFind control center at: http://www.freefind.com/
|
|
Free Web Counter
To add a counter for the number of visitors to your web site, login to WebCounter at: http://www.digits.com/ You can also get a free web counter for each email account you have at frontiernet.You are visitor number
to this web site.
To insert html code into your web page, as you will have to do to include the find or a counter
Temporarily type something recognizable at the spot where you want to insert the html code (eg. ????)
On the menu bar select: Tools > Macro > Microsoft Script Editor.
In the html edit window that opens up, find the special characters that you inserted (eg. ????).
Paste and insert the html code that you have copied from the web counter or freefind web site. Example:
<table>
<td>
<center>
<FORM ACTION="http://search.freefind.com/find.html"
METHOD="GET" accept-charset="utf-8" target="_self">
<font size=1 face="arial,helvetica" >
<A HREF="http://search.freefind.com/find.html?id=55956980">
Search this site</A>
or
<A HREF="http://search.freefind.com/find.html?id=55956980&t=w">
the web</a>
powered by <A HREF="http://www.freefind.com">FreeFind</A><br>
<INPUT TYPE="HIDDEN" NAME="id" VALUE="55956980">
<INPUT TYPE="HIDDEN" NAME="pid" VALUE="r">
<INPUT TYPE="HIDDEN" NAME="mode" VALUE="ALL">
<INPUT TYPE="HIDDEN" NAME="_charset_" VALUE="">
<INPUT TYPE="HIDDEN" NAME="bcd" VALUE="÷">
<INPUT TYPE="TEXT" NAME="query" SIZE="20">
<INPUT TYPE="SUBMIT"
VALUE=" Find! "><input type="SUBMIT"
name="sitemap" value="Site Map"><br>
</center>
<input type="radio" name="t" value="s" CHECKED> Site search
<input type="radio" name="t" value="w">Web search
</font></FORM></td></table>5. Close the html window (X in upper right corner).
6. Delete the special characters that you typed to locate the place to insert the html code (eg. ????).
Note: You may not see the result of the inserted html code until you display your page in a web browser.
Home
Develop web page
Locate host
Publish
Exercises
This webpage was last updated on Wednesday February 28, 2007 by Helen Mogill